1. Mục đích cài đặt và sử dụng:
- Tạo trang thanh toán điện tử và xử
lí việc mua hàng.
- Tạo trang con để liên kết tới node
cần nhấn.
2. Cách cài đặt và sử dụng Ubercart
và Product:
B1. Đầu tiên là cài đặt Ubercart, khi cài đặt cần chú ý
cài đầy đủ các module yêu cầu trước khi cài đặt Ubercart. Các module cần có như
sau: Rulers, Views, Ctools,Entity API, Entity tokens . Mà trong phần
làm trang chủ chúng ta đã cài các modules: views, Ctools nên bây giờ chỉ cần
cài đặt thêm Rules, Entity API là đủ!
B2. Sau khi cài đặt xong thì tiếp tục cài đặt Node Access
Product để làm trang con liên kết tới node.
B3. Khi cài đặt xong cần kích hoạt các modules để hoạt
động. Lưu ý: khi kích hoạt nên bỏ modul ubercart full fillment đi vì nó bị lỗi
khi tạo Product.
B4.
Sau khi cài xong thì vào structure>taxonomy để tạo 1 vocabulary mới
tên là Slide Style. Sau khi tạo xong thì vào trong list term >add term , tạo
thêm term mới tên là : Home Page Slide.
B5.
Sau đó vào Structure> conten type> basic page> manage fields add thêm
1 lable có tên Slide Style, có kiểu Term reference, và widget là Check boxes/radio buttons.
B6. Vào Conten>add content>product>tạo 1 product có
tên Shirt Lightblue và có chèn ảnh vào, điền các thông số phù hợp của sản phẩm
vào đó.
B7. Sau khi tạo xong product thì vào lại các bài viết
slide1,2,3,4: để sửa phần Slide Style là Home Page Style. Mục đích là để tách
phần nội dung trang chủ riêng, nội dung trang con Product riêng ra đấy!
B8. Khi reset lại trang chủ vẫn thấy có product hiện lẫn vào.
Muốn ko cho hiện thì vào phần Structure>view>edit view
slide>Filter criteria và add phần vocabulary là Slide style, phần Selection
type là Dropdown là ok! Lúc này trên trang chủ sau khi reset sẽ ko hiện phần
product vừa tạo nữa.
B9.
Muốn tạo 2 tab mô tả có tên : Shirts và Fit info. Trong đó tab Shirts được chia
thành 3 cột bé có hình như sau:

B10. Muốn có tab như thế chúng ta phải vào conten types để tạo
thêm 4 trường : Shirts Description, Shirts Classic Line, Shirts Care Ddvice
Shirts, Fit Info. Tất cả các trường để là Long text .
B11. Tiếp theo:tạo tabs . Thêm nội dung tabs trong
contens> edit product. Muốn chỉnh vị trí hiển thị của các trường trong
Product>Edit thì vào Structure>content types >product>manage
fields>chỉnh độ wieght là ok!
- Tạo thư mục themes trong thesurpriseshirt.com.Coppy
themes Shirt từ thư mục drupal>themes vào thư mục themes vừa tạo
này.Vào trong thư mục shirt và coppy file node.tpl.php thành 1 file khác
có tên: node—product.tpl.php cũng để trong thư mục shirt. Sau đó vào
thư mục cop thêm đoạn code để tạo tab trong trang web của jquery ui để
chỉnh sửa:
<div id=”tabs”>
<ul>
<li><a
href=”#tabs-1″>Nunc tincidunt</a></li>
<li><a
href=”#tabs-2″>Proin dolor</a></li>
<li><a
href=”#tabs-3″>Aenean lacinia</a></li>
</ul>
<div id=”tabs-1″>
<p>Proin elit arcu, rutrum
commodo, vehicula tempus, commodo a, risus. Curabitur nec arcu. Donec sollicitudin
mi sit amet mauris. Nam elementum quam ullamcorper ante. Etiam aliquet massa et
lorem. Mauris dapibus lacus auctor risus. Aenean tempor ullamcorper leo.
Vivamus sed magna quis ligula eleifend adipiscing. Duis orci. Aliquam sodales
tortor vitae ipsum. Aliquam nulla. Duis aliquam molestie erat. Ut et mauris vel
pede varius sollicitudin. Sed ut dolor nec orci tincidunt interdum. Phasellus
ipsum. Nunc tristique tempus lectus.</p>
</div>
<div id=”tabs-2″>
<p>Morbi tincidunt, dui sit
amet facilisis feugiat, odio metus gravida ante, ut pharetra massa metus id
nunc. Duis scelerisque molestie turpis. Sed fringilla, massa eget luctus
malesuada, metus eros molestie lectus, ut tempus eros massa ut dolor. Aenean
aliquet fringilla sem. Suspendisse sed ligula in ligula suscipit aliquam.
Praesent in eros vestibulum mi adipiscing adipiscing. Morbi facilisis.
Curabitur ornare consequat nunc. Aenean vel metus. Ut posuere viverra nulla.
Aliquam erat volutpat. Pellentesque convallis. Maecenas feugiat, tellus pellentesque
pretium posuere, felis lorem euismod felis, eu ornare leo nisi vel felis.
Mauris consectetur tortor et purus.</p>
</div>
<div id=”tabs-3″>
<p>Mauris eleifend est et
turpis. Duis id erat. Suspendisse potenti. Aliquam vulputate, pede vel vehicula
accumsan, mi neque rutrum erat, eu congue orci lorem eget lorem. Vestibulum non
ante. Class aptent taciti sociosqu ad litora torquent per conubia nostra, per
inceptos himenaeos. Fusce sodales. Quisque eu urna vel enim commodo
pellentesque. Praesent eu risus hendrerit ligula tempus pretium. Curabitur
lorem enim, pretium nec, feugiat nec, luctus a, lacus.</p>
<p>Duis cursus. Maecenas
ligula eros, blandit nec, pharetra at, semper at, magna. Nullam ac lacus. Nulla
facilisi. Praesent viverra justo vitae neque. Praesent blandit adipiscing
velit. Suspendisse potenti. Donec mattis, pede vel pharetra blandit, magna
ligula faucibus eros, id euismod lacus dolor eget odio. Nam scelerisque. Donec
non libero sed nulla mattis commodo. Ut sagittis. Donec nisi lectus, feugiat porttitor,
tempor ac, tempor vitae, pede. Aenean vehicula velit eu tellus interdum rutrum.
Maecenas commodo. Pellentesque nec elit. Fusce in lacus. Vivamus a libero vitae
lectus hendrerit hendrerit.</p>
</div>
</div>
</div>
Do đây là tạo trang web cho khách hàng
nên phần nhập này phải không được cố định để khách hàng có thể tùy ý thay đổi
theo ý mình. Chính vì thế cần sửa đoạn code html trên thành đoạn code php như
sau:
<?php
drupal_add_library(‘system’,
‘ui.tabs’);
drupal_add_js(‘jQuery(document).ready(function(){jQuery(“#tabsTest”).tabs();});’,
‘inline’);
?>
<div id=”tabsTest”>
<ul>
<li><a
href=”#tabs-1″>Shirts</a></li>
<li><a
href=”#tabs-2″>Fit Infor</a></li>
</ul>
<div id=”tabs-1″>
<div>
<p> SHIRTS DESCRIPTION
</p>
<?php
print($content['field_shirts_description']['#items'][0]['value']); ?>
<?php
hide($content['field_shirts_description'])?>
</div>
<div >
<p> SHIRTS CLASSIC LINE
</p>
<?php
print($content['field_shirts_classic_line']['#items'][0]['value']); ?>
<?php
hide($content['field_shirts_classic_line'])?>
</div>
<div>
<p> SHIRTS CARE ADVICE
SHIRTS</p>
<?php
print($content['field_shirts_care_advice_shirts']['#items'][0]['value']); ?>
<?php
hide($content['field_shirts_care_advice_shirts'])?>
</div>
</div>
<div id=”tabs-2″>
<p> FIT INFO </p>
<?php print($content['field_fit_info']['#items'][0]['value']);
?>
<?php
hide($content['field_fit_info'])?>
</div>
</div>
* Lưu ý: đoạn code:
print($content['field_fit_info']['#items'][0]['value'])
là để in ra các trường có tên trường
là field_fit_info( tên trường của máy quy định trong conten type>product)
['#items'][0]['value']: là đường dẫn
đến trường in khi sử dụng từng đoạn code một như sau:
print_r($content['field_fit_info']);
và vào lại trang product reset lại
để hiện code, sau đó nhấn vào chuột phải> view page soure sẽ hiện ra code,
và xem đường dẫn của nó ở gần cuối để cop và được
đoạn code như trên.
Còn câu code sau:
<?php
hide($content['field_fit_info'])?>
mục đích của câu code trên là để ẩn
đi trên trang của product mà chỉ hiện nội dung đó ở trên tab thôi.
2. Sau khi sửa code xong thì lưu lại
và vào trang web> appearance> vào nạp lại themes và vào trong
configure>performance>xóa cache và khởi động lại thì sẽ hiện tab lên.
3. Chỉnh sửa tab Shirt thành 3 cột
như yêu cầu bằng cách thêm đoạn code sau vào file style.css bằng cách sử dụng
CSS Path:
div#tabs-1.ui-tabs-panel div {
display: block;
border-width: 0;
padding: 1px;
background: none;
width: 300px;
float: left;
margin: 1px;
}
Thế là xong phần tạo tabs.
B12. Chúng ta sẽ tạo các thuộc tính đặc trưng cho sản phẩm
theo khách hàng yêu cầu như hình sau:
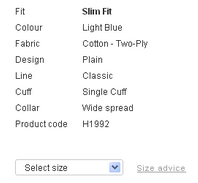
1. Muốn tạo được các thuộc tính của
sản phẩm như vậy. Chúng ta cần làm theo các bước như sau: vào content>shirts
lightblue>edit>attributes>add an attibute để tạo các attibute mới.
Theo hình vẽ thì các attibute cần tạo hầu hết ở dạng Radio box trừ attibute
Select size thì cần tạo ở dạng Select box. Nội dung của các thuộc tính này được
nhập ở phần Option.
2. Sau khi tạo xong thì lưu lại và
cần vào attributes để nạp các attibute mới tạo là ok!
B13. Lưu ý: Phần tên,phần giá cả và phần khách mua
hàng nhận mua sản phẩm thì sẽ tự có sau khi tạo Product.
Muốn ẩn đi các tên mà không thể xóa
thì dùng CSS Path để none thuộc tính display của phần cần ẩn.
-Minh Trung-
No Comment to " Cài đặt, sử dụng 2 module Ubercart và Product trong quá trình làm web bán hàng. "